Wireshark support

Overview
Experimental · Insiders only
Wireshark is the world's most popular network protocol analyzer. While Wireshark provides a full graphical interface for interactive packet analysis, its command-line version TShark operates entirely from the shell. This makes it ideal for headless systems, and transforms devices like the Raspberry Pi into a powerful tool for network packet capture.
TShark captures network traffic in real-time, supporting hundreds of protocols and offers powerful filtering capabilities without the overhead of a GUI.
Solution
Network troubleshooting and security analysis often requires capturing packets to diagnose connectivity issues, identify suspicious traffic, or optimize network performance. However, running a full GUI-based packet analyzer on a headless device or through SSH can be impractical or impossible.
RaspAP's TShark integration addresses this challenge by providing:
- A web-based interface for configuring and managing packet captures
- Support for Berkeley Packet Filter (BPF) syntax to capture specific traffic
- Automated capture management with ring buffers and limits
- Secure download of capture files for offline analysis
- All the power of Wireshark's capture engine without GUI requirements
Use cases
The TShark plugin is particularly useful in these scenarios:
- Troubleshooting connectivity issues: Capture DNS queries, DHCP exchanges, or failed connection attempts
- Security monitoring: Identify unauthorized traffic, port scans, or suspicious patterns
- Performance analysis: Diagnose latency issues, packet loss, or bandwidth utilization
- Protocol debugging: Examine application-level protocols like HTTP, MQTT, or custom services
- Network documentation: Create packet captures for reference or compliance purposes
Tip
Packet captures can grow large very quickly on busy networks. For this reason, the plugin's default settings define a duration limit of 300 seconds (5 minutes). You may of course modify this setting, or use capture filters to limit what's captured. Ring buffers are also supported to automatically rotate files and manage disk space.
Installation
RaspAP's TShark packet capture integration is available as an Insiders-only plugin that may be installed from the System > Plugins tab. Simply choose Details corresponding to the plugin, then Install now from the pop-up dialog.
The plugin installer automates the installation of the tshark package and its dependencies, configures the necessary permissions for packet capture, and sets up the required sudoers entries. When these steps are done, the installer will automatically refresh the UI. The Wireshark plugin will then appear in the sidebar and is immediately available to configure.
Capture settings
The Wireshark plugin provides comprehensive options for configuring packet captures. All settings are preserved between captures, but are not persisted across system reboots.
Click image to expand
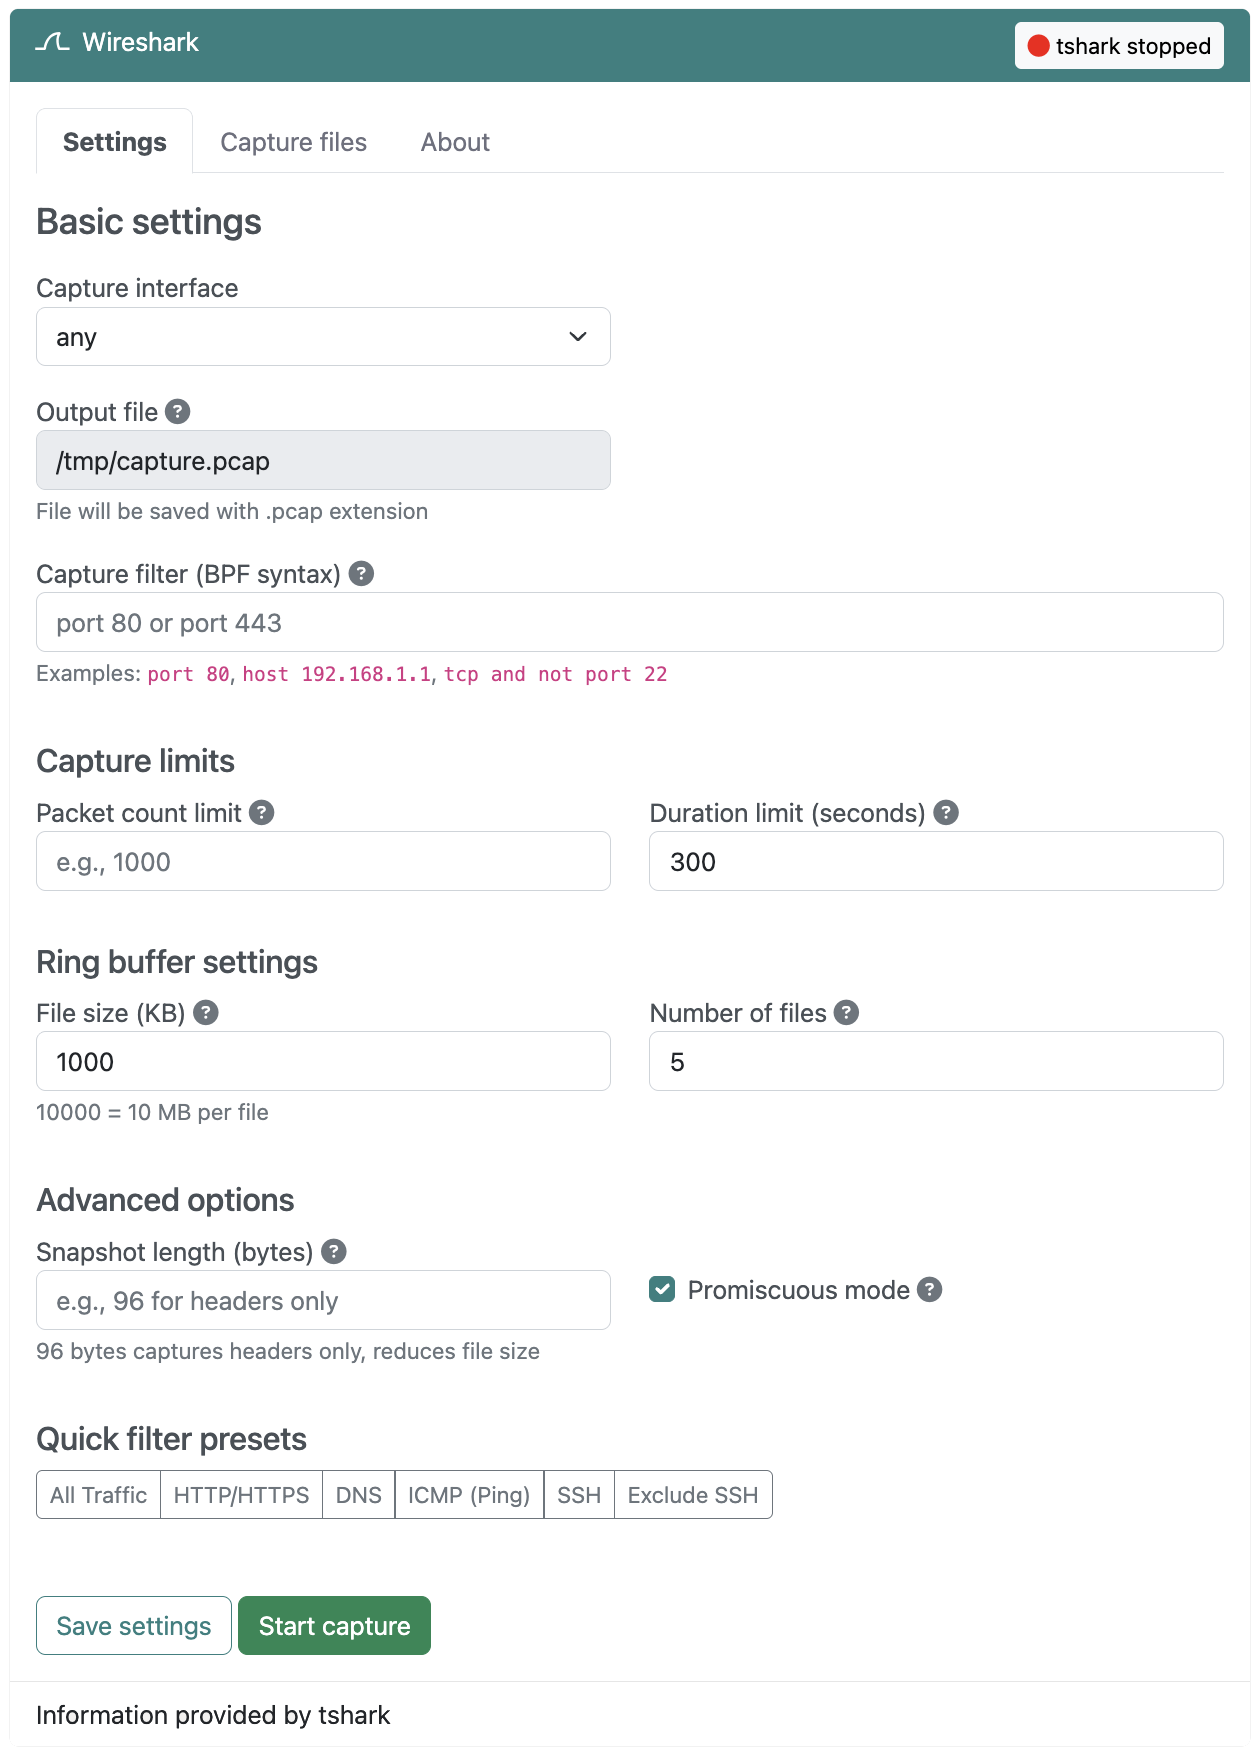
Basic settings
Interface
Select the network interface to capture packets from. This can be any active interface on your system, including ethernet (eth0), wireless (wlan0), or the special any interface to capture from all interfaces simultaneously.
Output file
This read-only setting indicates the path where capture files will be saved. Files are saved in a standard .pcap format, which is compatible with Wireshark and other packet analysis tools. The default capture file storage location is /tmp.
Capture filter (BPF syntax)
You can use the Berkeley Packet Filter syntax to capture only specific traffic. Leave this field empty to capture all traffic. Capture filters are applied during capture to reduce the amount of data saved to disk.
Common filter examples:
port 80- Capture HTTP traffic onlyhost 192.168.1.1- Capture traffic to/from a specific hosttcp and not port 22- Capture all TCP except SSHport 53- Capture DNS queries and responsesicmp- Capture ping traffic only
Note
TShark capture filters use BPF syntax and are applied at the kernel level during capture. This is different from display filters (used in Wireshark) which are applied after capture. For best performance, use capture filters to limit what's saved to disk.
Capture limits
Packet count limit
Stop the capture automatically after capturing a specified number of packets. Leave empty for unlimited capture. This is useful when you need a sample of network traffic without filling up disk space.
Duration limit (seconds)
Stop the capture automatically after a specified number of seconds. This is useful for capturing traffic during a specific time window, such as during application startup or a network event.
Ring buffer settings
Ring buffers allow you to capture continuously while automatically rotating files and managing disk space. This is essential for long-running captures on systems with limited storage.
File size (KB)
Create a new file when the current file reaches this size. For example, setting this to 10000 (10 MB) will create a new file every 10 megabytes of captured data.
Number of files
Maximum number of ring buffer files to keep. When this limit is reached, the oldest file is automatically deleted to make room for new captures. For example, with a 10 MB file size and 5 files, you'll maintain approximately 50 MB of the most recent traffic.
Advanced options
Snapshot length (bytes)
Limit the amount of data captured per packet. The default captures entire packets, but you can specify a smaller value to capture only packet headers. For example, 96 bytes is sufficient to capture Ethernet, IP, and TCP/UDP headers without payload data. This significantly reduces file size when you only need header information.
Promiscuous mode
When enabled (default), the network interface captures all packets on the network segment, not just those destined for this device. This is required for capturing traffic between other devices on your network. Disable this setting to capture only traffic sent to or from this device.
Quick filter presets
The plugin includes convenient preset buttons for common capture scenarios:
- All Traffic - Clear filters and capture everything
- HTTP/HTTPS - Capture web traffic on ports 80 and 443
- DNS - Capture DNS queries and responses
- ICMP (Ping) - Capture ping traffic
- SSH - Capture SSH connections
- Exclude SSH - Capture everything except SSH (useful when accessing RaspAP via SSH)
Managing captures
Starting a capture
After configuring your desired settings, choose Save settings to preserve your configuration. To begin capturing packets, choose Start capture. The capture will run in the background until it reaches any configured limits or until you manually stop it.
Warning
Starting a new capture while one is already running will fail. Stop the current capture before starting a new one.
Stopping a capture
Choose Stop capture to end the current packet capture. TShark will gracefully close the capture file, ensuring all buffered packets are written to disk. The capture file, or files, will then be available for download.
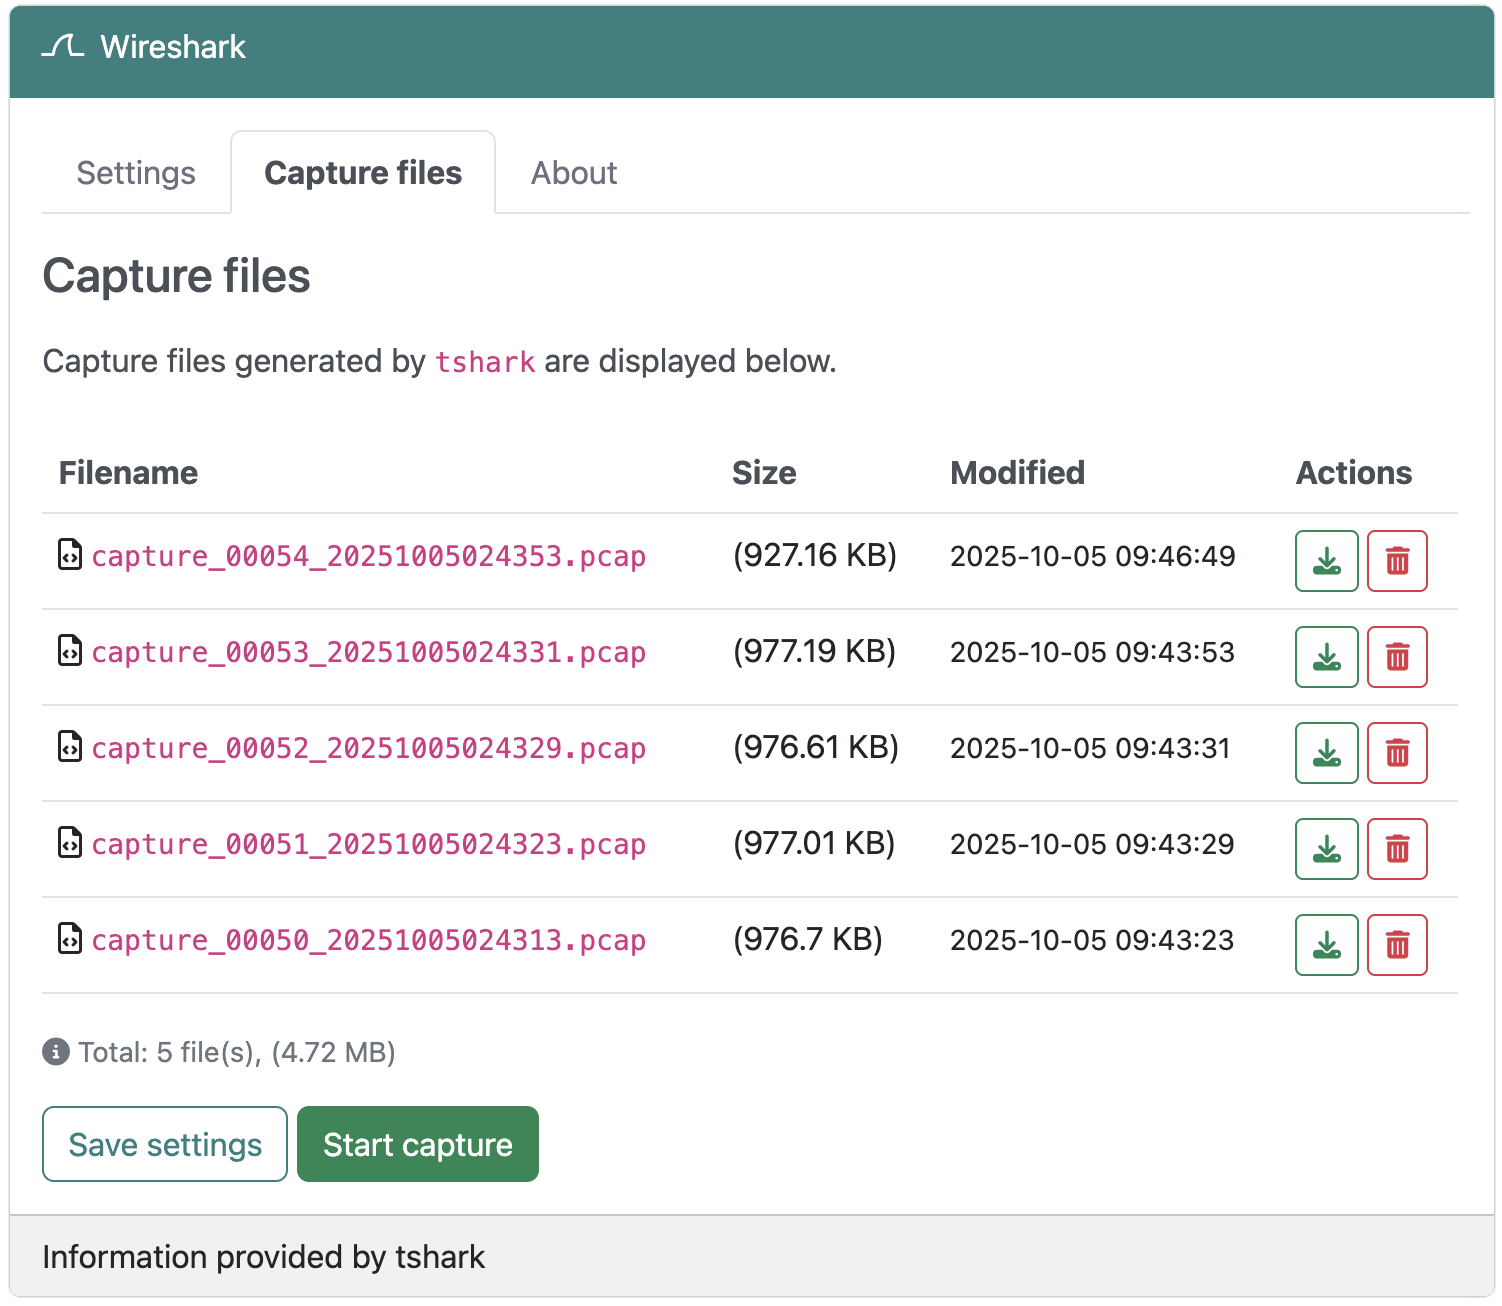
Capture files
The Capture files tab displays all .pcap and .pcapng files in the /tmp directory. The properties of each file is shown, including:
- Filename - The name of the capture file
- Size - Human-readable file size (B, KB, MB, GB)
- Modified - Timestamp of when the file was last modified
- Actions - Download or delete the file
Click image to expand
Downloading captures
Click or tap the Download button to securely download the capture file to your local machine. The file can then be opened in Wireshark for detailed analysis with its graphical interface.
Deleting captures
Click or tap the Delete button to remove a capture file. A confirmation dialog will appear before deletion. This is useful for managing disk space after you've finished analyzing a capture.
Tip
Capture files stored in /tmp are automatically deleted on system reboot. Download important captures before rebooting your device.
Tips and tricks
Analyzing captures with Wireshark
After downloading a capture file, open it in Wireshark on your desktop computer for powerful graphical analysis. Wireshark provides features like protocol dissection, stream reassembly, expert analysis, and graphical statistics that complement TShark's capture capabilities.
Using Termshark
Termshark is a terminal user interface (TUI) for TShark that brings Wireshark-like functionality to the command line. If you prefer working directly on your Raspberry Pi via SSH, install Termshark for an interactive packet analysis experience:
Open any capture file with:
Termshark provides a split-pane interface with packet list, packet details, and hex dump views — all navigable with keyboard shortcuts.
Capture filter strategies
Start broad, filter narrow
Begin with a broad capture (no filter) to understand overall network traffic, then use increasingly specific filters to isolate the traffic you're interested in.
Exclude your management traffic
When accessing RaspAP via SSH or HTTPS, exclude this traffic from captures to reduce noise:
Combine filters with boolean operators
Build complex filters using and, or, and not:
Managing disk space
Use ring buffers for continuous capture
Set a file size of 10-50 MB and keep 5-10 files for continuous monitoring without filling up your SD card. These guidelines will necessarily depend on the available free storage on your SD card.
Tip
When in doubt, you can find the storage used by your device on RaspAP's System > Basic tab.
Capture headers only
Set snapshot length to 96 bytes when you don't need payload data. This dramatically reduces file size while preserving all header information for most protocols.
Clean up old captures
Regularly delete capture files you no longer need from the Capture files tab.
Remote capture workflow
Here's a common workflow for remote packet analysis:
- Configure capture settings in RaspAP's web interface
- Start the capture and let it run (optionally with time/packet limits)
- Stop the capture when complete
- Download the capture file to your local machine
- Analyze the capture in Wireshark with its full graphical interface
- Delete the capture file from RaspAP to free up space
This workflow combines the convenience of remote capture with the power of desktop analysis tools.
Security considerations
Captures contain sensitive data
Packet captures may contain passwords, cookies, API keys, and other sensitive information transmitted over the network. Handle capture files with the same care as system logs or database backups.
Use HTTPS for access
When downloading captures over the network, ensure you're accessing RaspAP via HTTPS to encrypt the download.
Limit capture scope
Use capture filters to avoid capturing more traffic than necessary. For example, if troubleshooting a specific application, filter for only that application's traffic.
Troubleshooting
Capture files not appearing
Capture files are saved to the volatile /tmp directory by default. Verify the output file path in your capture settings and ensure the directory exists and is writable.
High CPU usage
Capturing on busy networks can be CPU-intensive. To reduce overhead:
- Use specific capture filters to limit captured traffic
- Enable UDP throughput optimization for high-volume captures
- Reduce snapshot length to capture only headers
- Use ring buffers with smaller file sizes
Download issues
Most browsers will raise a warning when attempting to download a file over an insecure connection. Given that .pcap files may contain sensitive information, it's strongly recommended to install an SSL certificate on your RaspAP host to enable encrypted downloads. Alternatively, use common secure Linux tools like scp or sftp to transfer files from your device for analysis.
Discussions
Questions or comments about using TShark's packet capture? Join the discussion here.